Special System Maintenance Menu - SYS
These functions should be accessed only by administrators or operator level users.
These programs are designed to address special situations not usually encountered in the day-to-day operation of your system. They often pertain to initial installation of the system or periodic maintenance issues. Only MIS or system administrators should access these functions. In certain cases, you may want some of these utility programs available to non-MIS users. You can only accomplish this by:
- allowing those users command line access which enables them to directly call the function, or
- establishing the call of the function from a customized attention key program, or
- allowing those users direct access to these menus.
| Function | Description |
| Organize Item Files - SYS 101 |
This program physically drops items marked for deletion by the system authorized users. No other jobs can be running when this program is activated. When you use this option to delete an item, the item is completely removed from the system. This includes customer preferences and BOM/Kit items at the product line, price class, and item level. For more information on deleting items from the system, click here.
|
| Organize Customer Files - SYS 102 |
This program physically drops customers' records marked for deletion by the system or authorized users. No other jobs can be running when this program is activated. Use List/Delete Inactive Customers - SYS 201 to automatically to list and mark inactive customers for deletion.
|
| Organize Inventory Files - SYS 103 | This program physically drops inventory transaction records marked for deletion by the system. No other jobs can be running when this program is activated. |
| Organize Price, Cost, Packaging, Manufacturer, Supplier, Salesman, & Product Line Files - SYS 104 | This program physically drops records marked for deletion in the files listed. No other jobs can be run when this program is activated. |
| Change Price, Cost, or Packaging Codes - SYS 106 | This program enables you to rename Price Class codes, Cost Class codes, and/or Packaging Class codes. It changes the code in the respective file, and in every occurrence of the code in the Item File. Use this program primarily to re-sequence these codes. |
| Auto-Duplicate Items for New Color# - SYS 107 | This is an extremely powerful utility for automatically creating new Item Master records, based on existing ones. For example, if you have an item that comes in ten colors (prints, grades), and ten sizes, you can create one color (in all sizes) and then automatically create item records in all sizes for the other nine colors. |
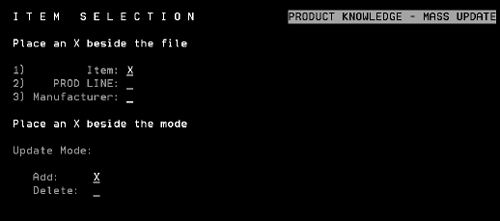
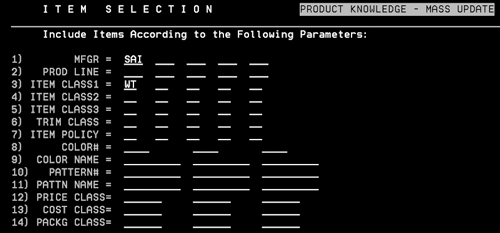
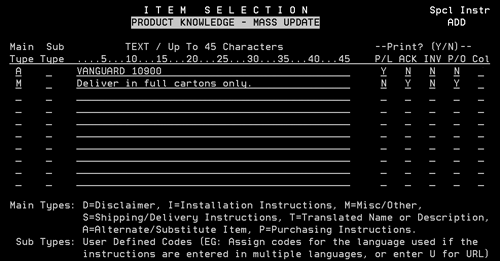
| This is an extremely powerful utility for updating multiple item records with the same information (such as updating all items of a manufacturer to have a certain class code). There are many options available in this program. Be very careful when using it. | |
| Duplicate Pricing Chart In Files - SYS 109 | This utility enables you to duplicate a pricing chart for multiple price and/or Item File records. |
| Change ltem#s (change in all files) - SYS 110 |
This utility enables you to change an item number in the Item File record and every occurrence of the item number in the database. For example, you can change item number ABC1001 to ABC9234. All orders, invoices, inventory, and so forth will be changed from ABC1001 to ABC9234. It will be as if the old item number never existed. It also accesses and makes changes to Our Item Number field within the Customer Preferences File. No changes are made to the customer's item number. Since this program causes many large files to be accessed and reformatted, this function should only be accessed during off hours. The following pertains to this program.
The F9 function allows you to make changes just for the items entered; and not system wide. A "Y" setting suppresses the manufacturer code from being changed on the Price Class, Cost Class, or Packaging Class for just the item(s) entered on this screen. |
| Purge Open Order File - SYS 112 | This program enables you to purge (remove from system) closed orders from the Open Order/Order History File. It requires a span of order numbers. The program will only purge orders that are not open. It is advisable that you save this file prior to purging. |
| Purge Inventory Files - SYS 113 | This program enables you to purge (remove from system) inventory transaction records. These are the records that make up the details of the Stock Card Screen. These records are also used for Inventory Reorder reports, Inventory Registers, and Inventory Audit Trails. It requires user to enter a date through which the system will purge. Important: You must run the Update Inventory Balance Forward program immediately after running this program! |
| Update Inventory Balance Forward - SYS 114 | This program updates the balance forward date and quantities for each item. These are merely place marks that enable the system to calculate current balances much faster than by going thorough all history records. It is used primarily by the Stock Card Screen function. The program requires users to enter a date for the balance forward. We recommend you enter a date that is two months back. Dates are entered in YYMM format. For example, if today is October 1996, enter 9608 as the balance forward date. This program does not effect or change inventory balance. It only speeds up searching algorithms. We recommend running this program approximately every three months. Also run this program immediately following option SYS 113 (Purge Inventory). |
| Purge/List Inactive Shade/Lot/Bundles - SYS 115 | This program purges and/or lists SKU File records with no activity and no open transactions. It can purge and/or move records to a history file. This program only improves your system performance if you use Lot number field often. |
| Purge Invoice File - SYS 116 | This program enables you to purge invoice details. Invoice detail records are used for invoice inquiry, reprints, registers, and X by Y sales reports. It requires a span of invoice numbers. It is advisable to save this file before purging. How much invoice history should be kept is based upon available disk space. |
| Fix Inventory Allocations - SYS 117 | This utility enables you to correct inventory allocation errors caused by invalid factors, failed jobs (from power failures, cancelled by operator, etc.), and other technical problems. |
| Run Inventory System Edit - SYS 118 | This report is periodically run by Kerridge personnel to check and compare balances in the inventory system of various files. There is also an update option, which automatically fixes certain imbalances. |
| Run Inventory UM Edit - SYS 120 | This report checks for invalid conversions between units of measure. |
| Purge Stray Special Instructions - SYS 121 |
This program removes stray special instruction records from customer and item/product files. When special instructions are created for an item or customer through the F12 Special Instructions screen, they are stored in a Special Instructions File. When an item or customer is deleted, the special instructions assigned to the customer or item do not get automatically get deleted out of the Special Instructions File. These "unassigned" special instructions can create unnecessary clutter and should be deleted through this option. To see if you have a problem with orphaned Special Instructions, run the List Special Instructions File (RMF 101). Orphaned records appear with RECORD NOT FOUND in the description column. |
| List/Delete Inactive Customers - SYS 201 |
This program lists and/or deletes inactive customer accounts from the Billto File. Accounts with open orders, A/R, or recent activity are not purged. The report lists all parameters for determining inactivity. This is the only recommended method for deleting customer Billto File records. Associated Files: |
| List/Delete Shipto Override Addresses - SYS 202 | This program lists and/or deletes old names and addresses entered as shipto overrides on Order Entry. It requires a span of order reference numbers. The reference numbers should equate to order numbers that have also been or will be purged. |
| List Items Tagged "D" for Deletion - SYS 203 |
This program lists any items containing a D in the delete field. These items that will be physically dropped from the master file when an organize or purge is run. You should not delete items as they may have sales or inventory history that is needed. Your data processing department should develop a plan for deleting unnecessary items. For more information on deleting items from the system, click here. |
| Duplicate Chart of Accounts For New Company - SYS 204 | This utility enables you to automatically setup a chart of accounts for a new company by copying an existing company's chart of accounts. |
| Insert Total Of Branch Budgets Into Company Budget's File - SYS 205 | This utility enables you to enter budgets in the Branch Chart of Accounts File, and have them totalled automatically to create the overall company budget in the main Chart of Accounts File. |
| Delete Unposted Cash or Manual Sales for This Terminal - SYS 206 | This utility is designed for the Accounts Receivable department. It can also be run by entering FIXAR at the A/R menu. This utility enables you to clear all cash receipts or manual sales entries entered at your terminal but not yet posted. Use this program when your edit has errors, and you'd rather start over than correct the error. |
| Extract Item Records For Export to Other System - SYS 207 | This enables our clients to trade Item and related files on a select manufacturer basis. This program copies the information into separate files that all begin with the prefix E. The E files can then be saved and sent to other systems. There is an option within this utility to remove prices and costs from the copied files in case it is confidential data. |
| Merge Item Records Exported From Other System - SYS 208 | This program enables you to receive the Item File and related data created in the previous program. It merges the information into the existing data base. This option is meant for customers with multiple systems that need to share Item Master File data. There is a an option to bypass all cost updating. It leaves prior costs in existing records. Various parameters fine tune this process. |
| Delete Import/Export Item Files After Extraction or Merge - SYS 209 | This program deletes the files used for trading Item File and related data. It should be run after sending or merging this data. These files can be large and may take up disk space unnecessarily. |
| Switch from Method A, to Method B, Interest Charge Application - SYS 210 | This utility program enables you to change the way interest charges (service fees or late charges) are accessed for past due customers. |
| Apply Interest/Service Charges Mid-Month - SYS 211 | This option enables you to access interest/service/late fees outside of the end-of-month process. When utilizing this option, it is important that you are consistent (always run this option at approximately the 10th of the month), and do not run more than once a month. |
| Vessel Updates Utility (Updates Dates & Status Via Vessel) - SYS 212 | This program is also available from the Purchasing Menu. It is a powerful utility program that enables you to simultaneously update all of the purchase orders and/or customer back orders related to an incoming shipment. The vessel can be a container ship, truck, and so on. It is intended primarily for importers and distributors who have a large volumes of back orders, and assigns those back orders to specific incoming shipments. |
| Setup FTP Configuration File) - SYS 231 | This is customer specific option. |
| List Salesperson Assignments On Today's Orders- SYS 301 | This is an extremely helpful program for new users, especially those who assign different salespeople to customers based upon product type. It verifies which salesman receive credit for each order. Use this program to correct salesperson assignments before they get to billing. |
| List Salesperson Assignments On Today's Invoices - SYS 302 | This program verifies salesperson assignments and lists any errors in today's invoicing run. A version of this program is also included in the daily Invoice Exceptions list. |
| Create Sales Tapes For Manufacturers - SYS 303 | This option enables you to create sales tapes/files for manufacturers that require this service. As each format is designed for a manufacturer, it is added into this option. |
| Save Manufacturers' Sales Tape Files - SYS 304 | This option saves the files created using the previous option. Different formats are supported. |
| Reset "Busy Flag" That Causes Orders To Display "Being Filled" - SYS 305 | This Program Clears The "BUSY" Flag That Causes Order Inquiries to Display "BEING FILLED". |
| Automatically Write-Off Small Lot# Or Serial# Quantities - SYS 306 | This utility automatically sets quantity onhand to zero and posts the adjustment using code W (write-off). A report showing the affect on inventory is printed. This program will only write-off quantities greater than minus 1.00 units, and less than positive 1.00 units. It can be run according to various parameters including by manufacturers and unit of measure. |
| Force Reaveraging of Costs-Per -Serial# & Update Summary Records - SYS 307 | This option forces average costs to equal the average based upon the actual serial number costs. It usually adjusts inventory by a very small value as well as readjusts the affect of rounding. |
| Run Future Price & Promo File Update (check effective/ending dates) - SYS 308 | This option, which automatically runs every night as part of the Night Jobs, adjusts the status of pricing records based upon the effective and ending dates, and lists all updates. The system also resets dates and statuses of all Billto File (F9) screen price exceptions, regardless of whether dates to be changed now. This ensures all pricing files are in balance. |
| Run Invoice Register, Showing If In Balance With Inventory - SYS 309 | This option automatically runs as part of the final step of the A/R end-of-month close. It prints a summary invoice register including verification that the costs of each invoice match the related inventory transactions. |
| Rebuild All System Logical Files/Alternative Indexes - SYS 310 | This option should be run only after a system crash or if the system is issuing messages that indicate corrupted indexes. It rebuilds all logical files/indexes. |
| List/Update S/N Allocation Errors & Holds Not Removed (IVAUD4,IV) - SYS 312 |
This program rebalances the inventory system so that serial number onhand and available quantities are exactly equal to the related stock card screens (history of individual transactions). The program includes provisions for dealing with blank serial numbers, and can recreate serial numbers that have been erroneously, or prematurely, deleted. The leading causes of inventory system problems are:
Using the Special Order system to order serialized items.
|
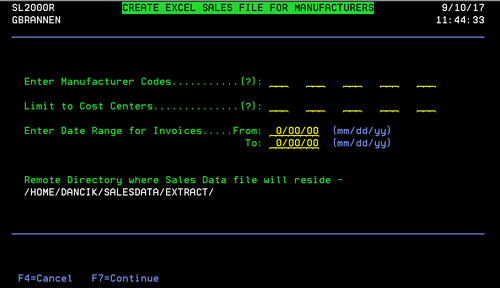
| Create Excel Sales File for Manufacturers - SYS 313 |
This option allows you to use the data in your files to create a Sales Data spreadsheet, to inform manufacturer's about the sales you have made of their products. This Excel Sales Data File is a standard file, which can be offered to any supplier asking for such data. However, it is not meant to follow any particular manufacturer's preferred layout. This file can also include manufacturer-specific information, as stored in your Billto File.
If applicable, enter the manufacturer codes (3 alpha characters), cost centers (3 alpha characters), and date range that you want to limit the report to. Entries are required in the Manufacturer and Date Range fields. The spreadsheet contains a row for each requested invoice/line number. |
| List/Delete Stray RBO Records (which cause "Being Filled" message) - SYS 314 |
This option removes stray "Being Filled" records that can occur when a user fills a back order, but deletes the receipt prior to posting the receipt. This program removes the stray records, and the "Being Filled" message from the Order Inquiry screen. When this option is selected, you are presented with the following options:
|
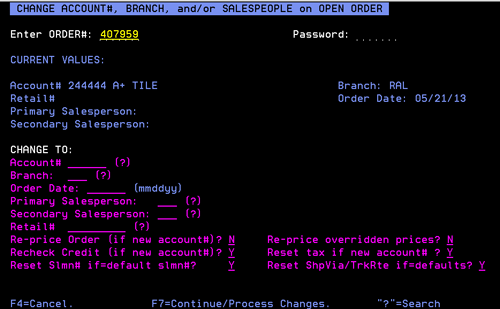
| Change Account /Branch/Slmn# Of An Order (CHGACT) - SYS 401 |
This program enables you to change the customer account number of an order without having to cancel it. We advise caution before using this program, as many pricing issues may need to be considered. It was created primarily for job quotes that are entered to a generic account number until the job is awarded. This would happen if your company had the specification, but didn't know who would get the job. This works effectively if the prices assigned to the quote are to be used regardless of which customer gets the job. Otherwise, prices should be updated after this program is used.
Change the order information as needed. Only orders that have not had any lines invoiced can be changed. If you enter an order number that has invoiced lines, you will receive an error message. Be aware that when you change the order date on an order there is the possibility that the data accumulated during night jobs and stored on statistics screens will no longer be accurate with regards to the changed date. It should be expected that date changes could introduce inconsistencies in this type of analysis. The date change appears on the Order Header screen. Do not confuse the Order Date with the Date Required/Ship Date. The order date normally defaults to "today's date" but can be changed when an order is originally entered. The order date is important for certain features related to Holds.
Associated Files
|
| Print Preliminary Order Adjustments Register For Today - SYS 402 | You can run a preliminary version of the Order Adjustments Register during the day. This is the same report automatically generated nightly from within night jobs. This report lists each order, in summarized form, that has been adjusted and shows the changes in value of the order. This report is enhanced to show the number of times each adjusted order was printed as a pick list. |
| Auto-Update Customer Rating Codes (ABC) Via Ranking Reports - SYS 403 |
This special feature enables you to have the system assign rating codes for your customers based upon a customer ranking and the 20/80 rule. We recommend ranking by gross profit dollars. The program will insert ranking codes as follows: Customers that make up 50% of your gross profit (usually 10% of total customers) are assigned A. Customers that make up the next 30% of your gross profit (usually 10% of total customers) are assigned B. (Your A plus B is equal 20% of your customers, and 80% of your gross profit.) Customers that make up the next 10% of your gross profit (usually 30% of your total customers) are assigned C. The remaining customers (usually5O% of customers) make up the remaining 10% of gross profit. These are assigned D. We further recommended that after this program assigns the rating code, you would modify as follows: Any customers that are not A, but are known to be a competitor's A should be changed to T (target customer). These customers should be treated like customers with A codes. New customers or customers not well known to your sales force should be changed to U for Unassigned or Unknown. |
| Reset The "Busy" Flag That Causes An Order To Display "BEING UPDATED - SYS 404 | This Program Clears The "BUSY" Flag That Causes Order Inquiries to Display "BEING FILLED". |
| Run Inventory System Edit With Optional File Updates (IVEDIT) - SYS 405 |
This option runs the Inventory Edit (IVEDIT) program. The IVEDIT Programs, along with the IVAUD4 program, keep the SKU File in balance with the Stock Card and Serial Number Screen can fix the problems caused by the situations listed below.
Guidelines for using this program:
|
| Inventory Adjustments to "Blank Serial#" Items - SYS 406 |
Accesses the Inventory Adjustments By Item program. This program is used to record adjustments in inventory balances by item number due to damage, write-offs, or cycle count variations. |
| Delete/Purge Inactive Items With Descriptions Starting With "ZZ" - SYS 408 |
Several customer begin the item descriptions of discontinued items with ZZ (i.e. ZZ DO NOT USE). This makes it easier to group them together and ensures these items are at the bottom of any alphabetical listing. This option deletes these discontinued items. For more information on deleting items from the system, click here. |
| Run Inventory System Edit #5 (OPENIV vs. Serial#, & Stray Ser#s) - SYS 409 |
This option runs a utility program that repairs the Stock Card view for all inventory records, based on the assumption that the Serial# screen is correct, but not the Stock Card. This program will remove any serial#s that no longer have any stock card entries or balances. They are not needed. |
| List Purge ITEM@1B/@4B Stats Records With All Zeros - SYS 411 |
Use this option to list or purge ITEM@1B-4B files. These files contain 25 months of statistical data for each item/warehouse combination. When these records are inactive (all zero), they can be purged. Purging these files can increase item search speeds and eliminate unneeded data. If the listing option is used, four reports are generated; one for each type of file (1B, 2B, 3B, and 4B). For more information on deleting items from the system, click here. |
| List Duplicate Item#s - SYS 412 | This option produces a report of identical item numbers. The only parameter that is not considered is the manufacturer. |
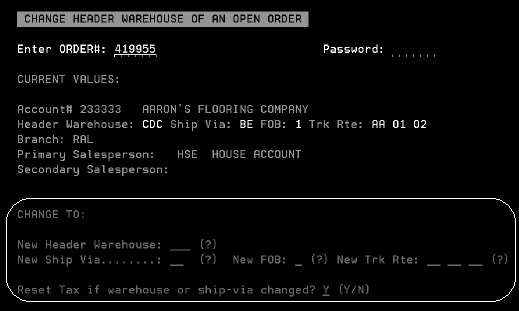
| Change Header Warehouse of an Order - SYS 415 |
This program:
Restrictions:
Making Changes Enter the order number and password. Press Enter to access information about the order. The input capable fields are at the bottom of the screen.
Make the necessary changes. If the Reset Tax if warehouse or ship-via changed field is activated, the taxes assessed on the order are recalculated based on the new warehouse or ship-via code. |
| End Order Print Queue Job and Job Queue - SYS 501 | This option shuts down the job that processes and prints orders after user enters order and selects the option to process or print. It also holds the related job queue. This option is automatically run at the beginning of Night Jobs and the last step of the A/R End of Month Close. |
| Start Order Print Job Queue and Job Queue - SYS 502 | This option starts the job that processes orders and its related job queue. This option is automatically run at the end of Night Jobs, and at the end of the last step of the A/R End of Month Close. |
| Customer Account Duplication - SYS 503 | This option enables you to copy the main fields of an existing Billto File record to a new account number. For example, if a new store of a chain is opened, you can copy an existing store's Billto File record to a new account number, and then make the necessary changes to the new account. The fields that are copied are basically the fields displayed on the Billto File Profile Screen. When you access this program, you are prompted to enter the existing account numbers and the new account numbers, and press Enter. The system then confirms that the existing accounts exist, and that the new accounts do not exist. Once confirmed, press the function keys as indicated to create new records. |
| Renumber Mailing List File Records and Remove Deleted Records - SYS 504 |
This option cleans up the Mailing List File. It needs to run only if you have deleted a large number of mailing list records and would like to clear the deleted records thus freeing those numbers. This program will also re-number the records starting with number one. Re-numbering has no affect on any of the mailing list programs. Follow instructions carefully when running this option. Enter and View Salesperson Assignment Changes/Future or Past and List/Process Future Salesperson |
| Enter & View Salesperson Assignment Changes/Future or Past - SYS 505 |
This function enables you to enter instructions for changing customer salesperson assignments on a given day. The Night Jobs will process these instructions and print a list of all changes that were made, plus others that will be made within the next two days. A new password (keyword "SLMN03") is required. This function also includes a search and inquiry ability, to see past and future changes. You can also force a listing andlor processing to occur during the day using option 506. The Future Salesperson Assignments program has three screens. The first screen requires you to enter the account number (or leave account number blank, in order to search and select customer accounts), and an "action code". The action codes are: "F" to add future salesperson assignment changes, or "H" to view previously processed (historical) changes. When the "F" action code is used, the second screen appears. It enables you to key multiple salesperson changes for the selected account. The fields on the second screen are:
When the "H" action code is used, the third screen appears. This screen is an inquiry into past changes for the selected account. You may also press [F6] to search through past changes for all accounts. The past changes only display a log of changes entered through this program. Changes entered directly to the Billto File are not recorded here. You may want to consider making all salesperson changes via this program. |
| Dun and Bradstreet Tape File - SYS 507 |
This option is active only if you have contracted Kerridge's EDI department to provide a file to Dun and Bradstreet in their required formats. Although options may vary, this program is used to provide Dun and Bradstreet with credit and accounts receivable information about your customers. They, in turn, will provide you with services which you have contracted them to provide. A file is produced and saved to tape with the following info. Any change from this format requires additional cost.
|
| Customer Notepad Analysis Report - SYS 508 | This report enables you to analyze user-defined fields established within your customer note pads. These are the fields that are prefixed with @, such as @FFT for Customer's Favorite Football Team. It works similarly to the Order Notepad Analysis Report, which is available via the Open Order Reports Menu. |
| Mass Update SKU File Accounting Costs - SYS 509 | This option enables you to automatically update the Accounting Cost field in the Stock Keeping Units (SKU) File. This option is intended for companies who need to analyze or report inventory values based on special LIFO or FIFO methods, and can not utilize the average or last costs that are automatically maintained by the system. This program enables you to retrieve specified historical costs (such as the cost at the end of last year) and insert it into the SKU file. The program provides options such as "Only update cost if no accounting cost already established". |
| Force Item File Order Entry U/M Field to Equal Native U/M - SYS 510 | This option forces the Item File Order Entry U/M field to equal the item's native unit of measure. The Item File Order Entry U/M field controls the unit of measure in which Order Entry will price. It does not affect your ability to check stock or enter the order in any unit of measure. This program can run for all items or all items of a selected manufacturer. If you always want items priced in the normal or native unit of measure, you should run this program. Refer to the Item File for more information on this field. |
| Reset Billto File Flags That Indicate BILLPRIC records exist - SYS 511 | This utility program resets the Billto File status flags that can improve performance of the pricing programs. The BILLPRIC File contains the pricing records that are entered on the Pricing Exceptions Screen, F9, of the Billto File. Each time you add new records to the screen the system sets flags that indicate what types of price exceptions exist for this account. This helps the efficiency of the programs, because they will not check for types of exceptions unless a status flag is set to do so. This program resets all of these status flags based on the pricing exceptions that now exist. This is primarily recommended for companies who have recently gone live on our system, and may have created and deleted many entries, and electronically converted Billto File data. It is acceptable to run this option at any time except while users are updating the Billto or Promotional File. |
| Assign an Account Number to a New Customer Based Upon Alpha Sequence - SYS 512 | This utility program finds the proper new account number if you have organized your customer file in such as way that the account number sequence is an alphabetized sequence as well. You enter the alpha name (first name, or last name if you assign by last name) and the system displays the account number that keeps records in proper sequence. |
| Decor24 & ICS Settings Statistics for Co, Branch, Cust - SYS 601 |
This option is no longer active. To get statistics reports (i.e., customer usage, activity) on your Decor 24 application, use the link: http://yourdomain/netdata/D24STATS.mbr/D24ACCTSTATS.CSV After the http:// part of the link, enter the customer's box name that you want to run an activity report for. |
| Create a tape for TRW Business Credit Services - SYS 602 | This option allows you to copy your customer's credit analysis onto tape or other media to send to TRW for Business Credit reporting. It supplies credit information regarding your customers for analysis by TRW Business Credit Services. |
| EDI Audit File Inq. and Upd - SYS 603 | This option allows you to view and update the EDI Audit File. This file contains information about inbound EDI orders that can be used to check for duplicate orders and to return to trading partners. This file can be sequenced and searched by PO number. The main function of this program is to manage the exceptions to the "must have unique customer purchase order numbers" rule. The unique purchase order number option is set by establishing a purchase order number edit mask in the Customer Preferences File. Sometimes due to typing errors or authorized exceptions, you may need to allow a duplicate purchase order number to go through. This option enables you to allow specific purchase order numbers to be entered more than once. |
| Copy a General Ledger Journal # SYS 604 | This option allows you to copy a General Ledger journal. A journal number is specified, and that journal is copied to a new journal number. |
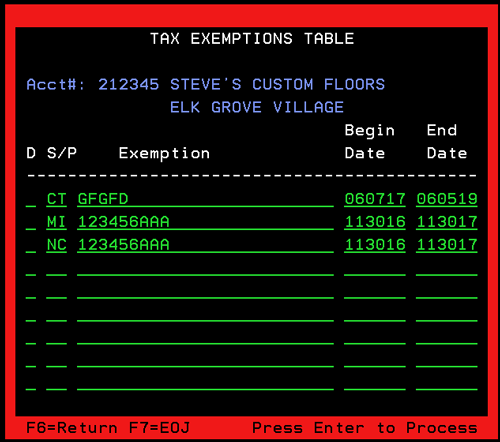
| Tax Exemptions by State/Province File Maint. SYS 605 |
This file maintains exemptions by customer, by state or province, with start and expiration dates. If this file is activated, tax exemptions for each order will be checked, based upon the customer account# and the state into which the material is being shipped, or the state assigned to the warehouse from which a will-call is made. If an exemption record is found for that account and state, and the current date is within the start/expiration date span of the exemption, then the order will be considered non-taxable (tax exempt).
It is HIGHLY recommended that you enter an End Date for each Tax Exemption; even for states that do not need an expiration date. for their tax exempt certificates. If no End Date is entered the Tax Exemption could be overlooked because of how the system processes and stores a blank End Date setting. |
| Tax Exemptions by State/Province File Listing - SYS 606 | This option allows you to print a list of customer tax exemption numbers. |
| Update Bar Code Pool Date to Match OPENPO Ship Date - SYS 607 | This option ensures your bar code label pool ship date is equal to the open order file ship date. It resyncronizes the two files. It can be used if a date in the pick pool does not match the open order ship date. |
| Rebate Reconciliation Maintenance - SYS 608 | This option enables you to flag individual invoiced lines upon the receipt of a rebate. Invoices that involve rebates are identified by an entry in the Cost Allowance field. By marking each rebate that is received, you can reconcile outstanding versus paid rebates using the Promotional Sales Report. This can be a time consuming task, as each invoiced line with a rebate needs to be updated individually. However, using EDI from your supplier could make this task instantaneous. |
| Automatically Create SKU File Records - SYS 609 | This option will automatically create stock keeping unit file records for selected items. This option should only be run if directed to do so for a specific application. If you set the stocking matrix to replenish a warehouse that has not had any previous activity in a certain product, then you must first establish SKU File records for that warehouse or product. Normally, if any activity has occurred, the SKU records would have automatically been set up by the purchasing, receiving, or order entry systems. This program can create multiple SKU records for specified products in a warehouse. Be careful not to create unnecessary SKU records as they can negatively affect system performance. Limit your requests to only the products you require. |
| Automatically Build Warehouse Locations Table - SYS 610 | This option will automatically create stock keeping unit file records for selected items. This option should only be run if directed to do so for a specific application. If you set the stocking matrix to replenish a warehouse that has not had any previous activity in a certain product, then you must first establish SKU File records for that warehouse or product. Normally, if any activity has occurred, the SKU records would have automatically been set up by the purchasing, receiving, or order entry systems. This program can create multiple SKU records for specified products in a warehouse. Be careful not to create unnecessary SKU records as they can negatively affect system performance. Limit your requests to only the products you require. |
| Update Billto File Ship Via Codes by Chain/Region - SYS 611 | This option will update the Billto file ship via and truck route codes based on chain or region. It prompts you to enter a chain code, an optional region code, and a new shipvia code to insert into the Billto File Default Ship Via field. |
| Test for Data Decimal Errors in Certain Files - SYS 612 |
This option is used by Kerridge personnel to test for non-numeric data in numeric fields. Data decimal errors are caused when the AS/400 senses non-numeric data in a numeric field, usually caused by non-initialized fields. Although programs can be instructed to automatically initialize these fields, it is often important to track the cause or origin of the non-numeric condition. With the increased use of EDI and system-to-system communities comes increased exposure to all types and conditions of data. |
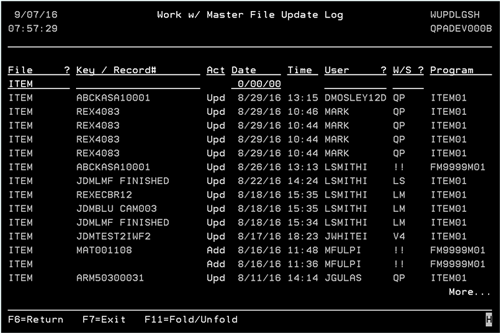
| Log Of Master File Updates - SYS 613 |
The Master File Update Log allows you to review who has updated various fields in the Billto, Item, Price, Product Line, Packaging, and Cost files. The Log Of Master File Updates Inquiry allows you to list the log entries in many different sequences. You can enter into one or more of the "position to" fields in order to view specific entries. The program then automatically selects the best available access path and positions the log at that point. Columns are highlighted indicating the access path selected. Whenever a question mark (?) is displayed, you can enter a question mark (?) to see a list of valid values.
The F2 Fold/Unfold function displays additional information, such as marketing programs, about the entries. Associated Files
|
| Build Item Packaging Extracted - SYS 614 |
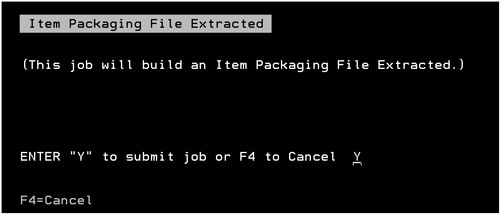
This option allows you to set up an automatic or on-demand process for extracting item packaging information into a spreadsheet or database. The extract converts the native unit of measure to every unit of measure that is in the packaging file for the item. This data can be used internally to data mine packaging conversions and other information. Running the ExtractAutomatically - The file can be rebuilt at any desired time frame such as nightly or weekly. Customers can accomplish this by adding to the WKRJOBSCDE that IBM supplies. Setup the job schedule entry to CALL PGM(DW5005C). On Demand - The option, SYS 614 on the Special System Maintenance Functions. The first screen in the on-demand process, via menu option SYS 614, is shown below.
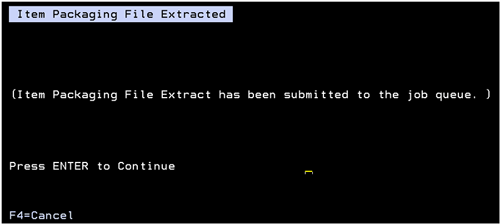
Enter a "Y" to submit the job. On the next screen press Enter to continue with the job submission.
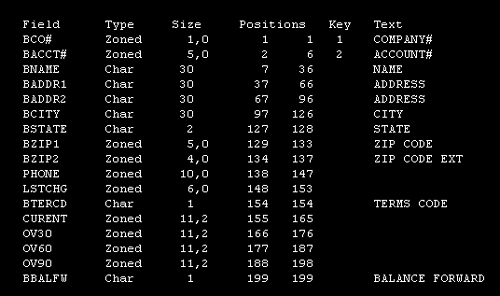
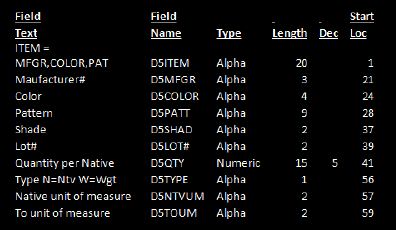
When the extract is run either manually (via SYS 614) or automatically (via call WRKJOBSCDE) a database file named DW0005F is built. The DW0005F database is accessed just as any other database file. The layout of the DW0005F file is:
This information can then be downloaded into a spreadsheet and manipulated as needed. Inclusion of Data:
Exclusion of Data:
|
| Remove Observability From Libraries - SYS 701 | This option frees disk space by removing a feature known as observability, allowing programmers to debug programs. Observability is an AS/400 term that roughly translates to "object programs that include a debugging map". Observability is not required on systems unless programs are developed on them. |
| Automatically Indent 2nd Line of Item Descriptions - SYS 702 |
This option automatically indents the second line of the Item File's description, by three spaces, for ease of reading reports and search screens. The indentation is done only if:
|
| Clear Manifests/Receipts From the Unvouchered Receipts Report - SYS 703 |
This option allows you to clear manifests or receipt numbers that should not be on the unvouchered receipts report. This feature is meant for those companies who reconcile the Receiving and Payables System. This program is extremely helpful when first starting to reconcile because you can clear old manifests or receipts that were not originally entered in the AP system. |
| Download Item & Price File to Tile Estimator - SYS 704 | This option enables you to create files for tile contractors that load into the Tile Estimator software product. Tile Estimator is a stand alone estimating system for tile contractors. By downloading Item and Price Files, contractors can automatically price jobs with your material, and either transmit directly to your system, fax orders using your item numbers, or dial-in using FLOOR 24 or the TILE LINE. |
| Stock Status List for Inventory with Lot#s - SYS 705 | This option lists all inventory using the lot number field. This includes special order stock, which uses lot numbers S000 through S999. This option is intended for the monitoring of un-invoiced special orders, and management of lots in general. Do not confuse lot numbers with serial numbers. This option pertains specifically to lot numbers, although a single lot number may contain multiple serial numbers. |
| Control Panel Printer Assignments Updates - SYS 706 | This option allows you to change multiple control panel printer defaults for multiple control panels simultaneously. It accesses the Control Panel entries originally established using the Control Program on the System Settings menu. You cannot add new Control Panel records here, but you can access all existing records. |
| Control Panel Default Assignments Update - SYS 707 | This option allows you to change multiple control panel default values for multiple control panels simultaneously. It accesses the Control Panel entries originally established using the Control Program on the System Setting Menu. You cannot add new Control Panel records here, but you can access all existing records. This option does not contain all available options from the Control Program, but it makes the most critical options more manageable. |
| User Control Panel Assignments Update- SYS 708 | This option allows you to change multiple CTRLUSER records simultaneously. You cannot add new CTRLUSER records here. You can only update existing records from this program. This option does not contain all available fields in the CTRLUSER Program, but it makes the most critical options more manageable. |
| Reprint Transfer Pick Lists For Range Of Order#s (Today/Yest)- SYS 709 |
This option enables you to reprint specific order numbers as transfer pick lists. This option should only be used if an original transfer pick list has been lost. You can specify a range of order numbers to be reprinted. It does not matter when the original transfer pick list first printed. This program also prints new transfers that have not yet been printed. Therefore, you should either use this program immediately after new transfers have been printed, or be aware that new transfers may print along with the specified order numbers. There is also an option to Reprint Transfers from before Yesterday. This feature is designed for companies that print paper transfer pick list and sometimes need to reprint them. |
| Reset Billto File Status Flag For Floor Plan - SYS 710 | This utility program resets the Billto File status flag which indicates whether or not an account uses the Floor Plan system. Whenever an account is set up in the Customer Floor Plan Assignment File, the flag is set to ON. This flag instructs other programs on the system whether or not to retrieve Floor Plan information. This option should be run only if many changes are made to the Billto File, such as converting or adding customers from external systems or EDI, or to the Floor Plan files. This program aligns files for optimum Floor Plan system performance. |
| Utility Menu for Checks and Balances of Item Related Files - SYS 711 |
The Conversion Check Utility Menu creates reports when converting to the Kerridge System. The programs on this menu analyze data and list questionable entries. Some items listed on the reports are not errors, but may be warnings that need to be analyzed on a case-by-case basis. Each option on the Conversion Check Utility Menu is described below: Run Check Against Item File
Run Check for Special Units of Measure
Run Check Against Packaging File
Run Check Against Pre-Receipts File
Checks for Invalid Quantities
Checks for System Required Files
|
| Utility Menu for Barcode Pool - SYS 712 |
This file contains defaults for the Barcode Pool, thereby reducing keystrokes and saving time for warehouse personnel. This new enhancement allows you to control the shipping dates that appears on the screen, and to pick a default sort category. This feature allows options such as setting the cutting machine to default to the cut/ roll picking option and the tile/carton workstation to default to the areas sort option. These options are accessed without tabbing to the desired sort. If a warehouse is entered, it becomes the default. If left blank, the control panel warehouse is used. The options available on this menu are: List/Update Differences between Pool Ship Date and Order Ship Date Prints a list and updates the pool with the shipping date from the related order header. This option re-synchronizes the pool and should only be used under special circumstances. List Pool records which have previously printed Lists pool records which are also in the Bar Code Label Audit File, meaning they have already printed at least once. These records should not be in the pool if they have already printed. Pool print history inquiry This option shows the Audit File which is updated each time a label prints. Remove Pool records prior to a requested date This program prompts for a ship date and removes any pool records prior to this date that have a closed or deleted order line. This program can clear old unused pool records for orders that are no longer open or that did not need or utilize the bar code labels. List/Update pool record area and printer ID fields Reads throughout the pool and updates the area and printer ID based on the most current data. This program should be run when changes are made to the area or locations files that you want reflected immediately in all pool file entries. For example, if you have moved certain locations to a new warehouse area, this program updates any existing pool records with those locations to the new area. The next time the pool is viewed by area, the new areas are reflected. Locations and areas are maintained using the Warehouse Menu. |
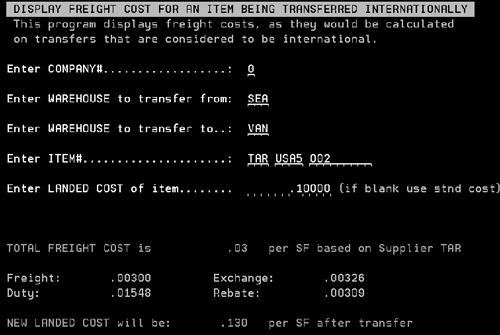
| International Transfer Cost Inquiry - SYS 713 |
This utility displays freight costs as they would be calculated on transfers that are considered international. It provides a way to quickly and easily check freight costs on international transfers before the receipt is actually entered. The company# is for the "to" warehouse (customer that is placing the order). If you do not enter a base Cost, the standard base cost from the cost file is used. In the example shown below, Company 0 (VAN) is inquiring on the international transfer cost of item TAR USA5 002 from warehouse SEA. The landed cost before the transfer is $.10. The landed cost of the item after the transfer will be $.130.
Accounting Considerations The Inventory Summaries By G/L Acct (GL 112) is run as usual at the end of a month. The extended format of this report has been enhanced to include a new section entitled "Transfer IN/OUT". For transfers, the additional freight at the destination warehouse is journaled to the GL account for "additional freight" in the Inventory To GL Interface file. |
| International Transfers GL Report and Journal - SYS 714 |
This program lists the breakdown of freight costs for international transfers to include duty, exchange rate and freight. It also creates actual entries to record the break down to offset the lump sum freight posting. Enter a "Y" in the Create GL Journal Entries field to breakdown the additional freight cost into separate GL accounts. A separate journal is created which reduces the GL account assigned to "additional freight" by the amount of duty, exchange, and supplier rebates incurred by the international transfers. The net effect is that the freight account, duty accounts, supplier rebate accounts, and exchange accounts are now adjusted for the international transfers. The Freight GL account is pulled from the Intercompany Transfer GL Interface (ACT 121) if it is setup. If it is not setup, the freight information is pulled from the Inventory to G/L Interface File - ACT 103. The GL accounts used for the duty, exchange, and supplier rebates come from the duty, exchange, and supplier rebate tables on the System-Wide Settings - Part 1 (Green Screen menu option SET 4) menu. |
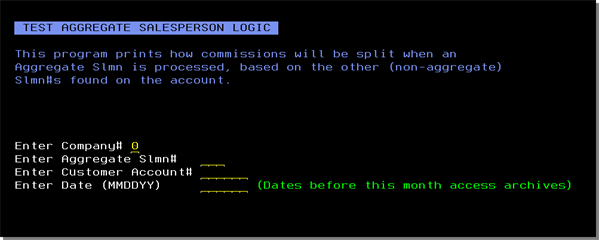
| Test Aggregate Salesperson Logic - SYS 715 |
This setting lets you test the Aggregate Salesperson logic. After you have set up at least one aggregate salesperson (in the Salesperson File) and optionally set up the Salesperson Participation Table, you can use this option to test the logic.
Aggregate Salesperson logic is only applicable if you assign multiple salespeople to each customer account. If you assign only a single salesperson to each customer account, then you may only use aggregate salespeople as a category for the commission reports. For more information on Aggregate Sales, refer to Commission Sharing.
|
| Reverse A Cycle count (reverses all adjustments) (IV/IVR103CL) - SYS 801 |
This option allows you to reverse the effect of an incorrectly posted cycle count. It reverses all of the cycle count adjustments made for a warehouse on a specified date. |
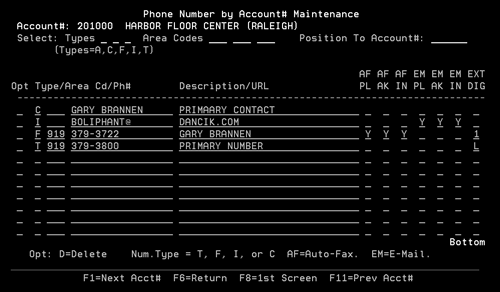
| Phone Number File Maintenance (with special options) (US/PH002RCL) - SYS 802 |
Maintain the Phone Numbers File and its special options regarding auto fax and auto E-mail.
Supplier/Account Number - Enter a valid supplier number (three character alpha) or a valid account number (six character numeric). Number Type - There are four number types: T - telephone number, F - fax number, I - Internet/email address, C -Customer Contacts (allows you to designate entries as "order contacts" for the account). Area Code - Specify area codes except for number type I. Phone#/Email - This is an alphanumeric field which accommodates different types of numbers. Do not insert spaces or punctuation in telephone or fax numbers. There are two ways to enter email addresses.
Description/URL - Optionally, you can enter a description of what the number represents. This field can also be used as an overflow if an email address does not fit on the Phone#/Email line. Options - AF=Auto Fax, EM=E-Mail, PL=Price list (for Billto File) or Purchase Order (for Supplier File). AK=Order acknowledgement. IN=Invoice. Enter Y to indicate that this phone number or e-mail address is the preferred recipient. Extra Digit - Enter L if this is a local number and you want the area code to be ignored. Enter 1 (or other applicable digit) if a prefix number should be dialed prior to the fax number. |
| Automatic Load Of Billto File Fax #s Into Phone Number File (US/PH003RCL) - SYS 803 | This option allows you to copy fax numbers from the Billto File into the Phone Numbers File. |
| Check Order, Invoice, & Reference Number Wheels - SYS 804 |
Is used to check and list the spans of invoice numbers, order numbers, purchase order numbers and reference numbers that are in use and available for use. This allows you to schedule and plan for the purging and archiving of the order and invoice files. Every night during Night Jobs, a verification program is run to see if reference numbers, orders, purchase orders or invoices need to be purged due to the system limit of one million each of reference numbers, order numbers and invoice numbers. The verification program lists any files which may require purging within the next month. This report should be checked daily depending on your transaction volume. |
| Convert Non-Serialized Items To Serialized - SYS 805 | This program can convert selected items, product lines and manufacturers from non-serialized to serialized status. In order to fully utilize all VISION Distribution features, it is recommended that items be serialized. However, do not serialize items until you understand all of the ramifications. |
| List/Update Inventory Balances - SYS 806 |
The List/Update Inventory Balances allows you to do real time inventory balancing by item number. This option allows you to run the equivalent of an IVAUD4 and an IVEDIT update for a single item. This process forces all related inventory files. (Serial number balances, SKU balances, item balances) to be synchronized with the detailed history of all transactions, as represented on the Stock Card Screen. Select option 1 to run a report only, listing any imbalances, or option 2 to update any records that are found to be out of balance. On the next screen, enter an item number. All serial numbers and all SKU records for that item are checked and optionally updated. You have three options to run the report: 1) interactively and immediately, 2) load it on the main job queue, 3) or run the job as part of Night Jobs. Regardless of how or when the update is generated, a report is created that lists all inventory found to have imbalances. Often the imbalance is a small quantity, such as .01, due to rounding. The leading causes of inventory system problems have been tracked over the past few years and the following conditions have emerged:
|
| Change Price Exceptions File Dates - SYS 808 |
Allows you to change the effective and ending dates in the Customer Pricing Exception Screen (F9) for all customers. This function will not update any promos in the customer pricing exception screen. To update promos use option 413 - Mass Update Promo File Expiration Dates. This program changes all Customer Pricing Exception dates that match your parameters. This program is designed primarily for pricing exceptions which have been coded to expire 12/31/99, but are really meant to continue perpetually. These should be changed to expire on 2/22/22. |
| Hold/Release/Update Open Payables - SYS 811 |
You can use this program to:
|
| Slab Balance Analysis & Update - SYS 812 |
This program looks at all slab items in inventory, and recalculates all square footage based upon current piece sizes, and optionally updates the square footage when an imbalance is determined. This program can reverse the results of any slab adjustments that were made incorrectly by SF, instead of by re-sizing pieces. |
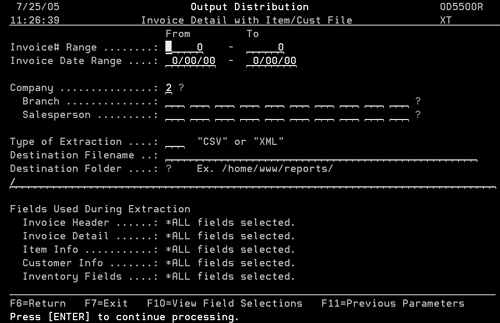
| Sales Data Extraction (XML,CSV) - SYS 813 |
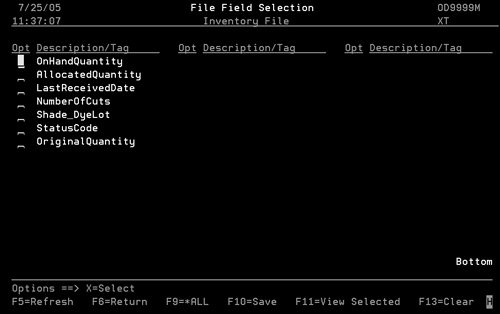
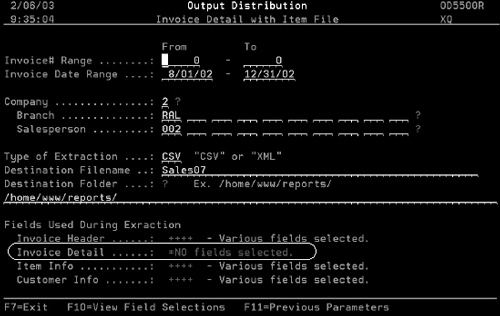
This feature enables you to extract sales data from the Invoice History, Item, and Customer files. You can select the fields you want and output to CSV or XML files, thereby enabling you to import sales data into spreadsheets and other third party tools. The results for the two formats will vary (i.e. some invoices might be on the .CSV report and not on the XML report). The .CSV version is tied into the ROLLS file whereas the XML version is not. You can select to extract from the following files/fields:
Also note, some fields may be included on your systems' selection screens that are not included on the sample screens in this chapter.
|
| User-Defined Trigger Programs - SYS 820 |
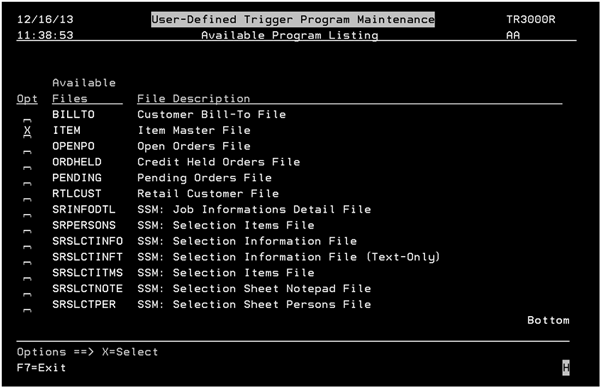
This trigger system was introduced in 2013 to facilitate real-time data gathering and reporting. The DESTRIGGER job was built to react to certain database changes, inserts, and/or updates and execute specific APIs based on the file that was altered. Click here to open up a pdf file that helps explain how triggers work. To manually stop and start the DESTRIGGER job, use these commands:
How it works - An Example Menu Option SYS 820 lets you apply your own custom triggers to the DESTRIGGER engine. You can apply trigger programs to gather data when an Insert. Update, or Delete action is performed. Select a trigger to work with.
In the example shown below, whenever a record in the Item File is updated the system automatically starts program ITMUPDTRG.
|
| Run Inventory System Edit #10 - SYS 901 | This program removes all holds from the ROLLS/SERIAL# records that should not be there - either because they are on a blank serial number or because there is no corresponding OPENIV (stock card record. It also removes "scheduled" quantities on ROLL records with serial numbers which should never occur except for account number 2 stock to stock transfers. |
| Run Inventory System Edit #11 - SYS 902 |
This option looks for stray open inventory (OPENIV) records that do not have a serial number. It then creates an OPENIV record and sets the total to zero. This ensures no serial numbers are created for the stray OPENIV record. This can be the case when the serial numbers are OK, but the customer cannot use program IVAUD4 (option 312 - List/Update S/N Allocation Errors & Holds Not Removed on the special functions menu) because stray OPENIV records bring the serial numbers "back to life". |
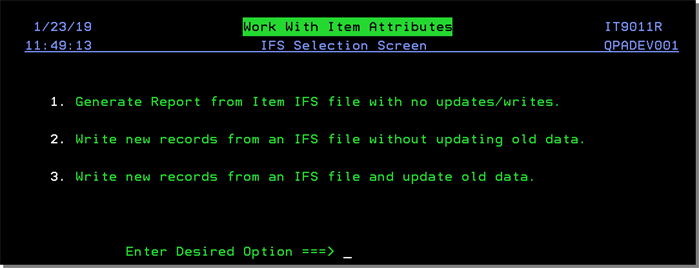
| Import Item attribute records from the IFS - SYS 903 |
This option allows you to automatically import and/or update item information from a .csv spreadsheet or other file and perform a mass update on the item attributes file.
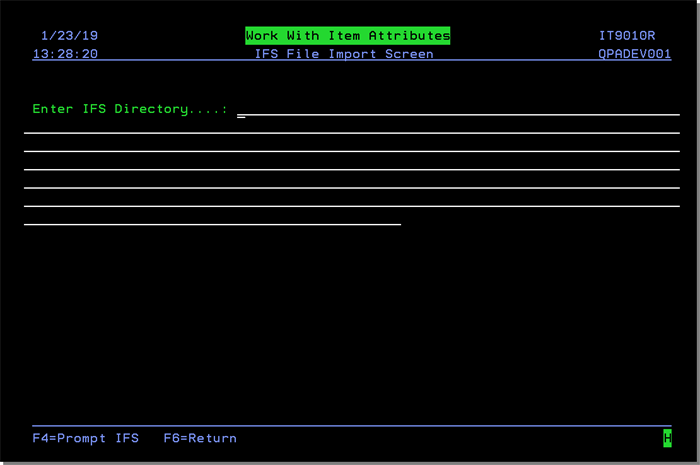
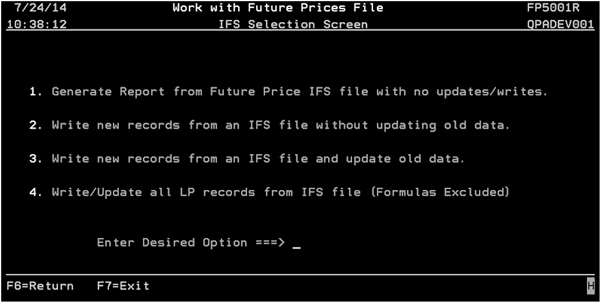
Enter an option and press Enter. The next screen to appear lets you enter the address where the update spreadsheet is located.
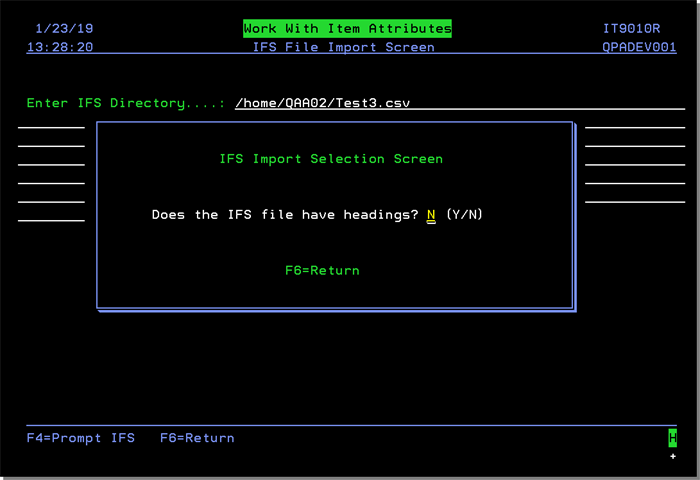
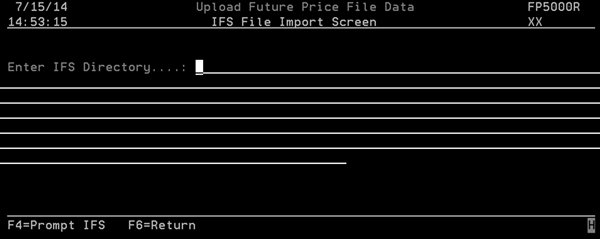
Enter the directory and press Enter. The system accepts the directory and responds back with the following question.
If the spreadsheet has a heading (i.e., Distributor Item, Style Name, Style Name, Color Name, Color Number), enter a Y. If not, enter an N. Press Enter. The system performs the function directed in step 4 (inquire about changes, update existing attributes, update existing attributes and add new ones). A report is generated that shows which item attributes were changed and what the changes were. |
| Warehouse Price List Cross Reference Table - SYS 904 |
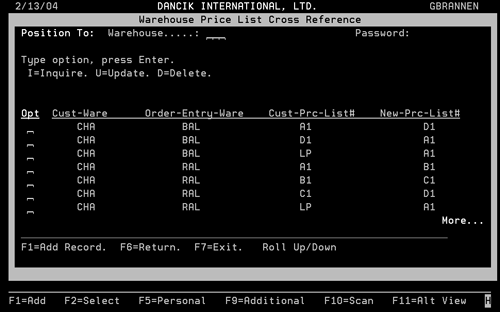
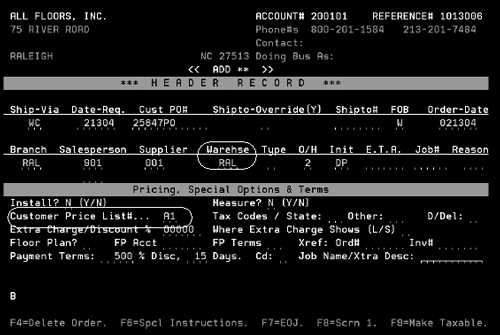
The Warehouse Price List Cross Reference Table allows a price list to be dynamically changed based on the header warehouse. For example, if a customer normally assigned to a warehouse in New York (NYC) will pick up at Raleigh (RAL), this table can automatically change the price list to one that is associated with the RAL warehouse. This table, and the concept of pricing by warehouse, is meant for businesses that do not assign a single price per product to each customer. Using this feature causes prices for customers to change based upon the header warehouse code of each order. This concept may be applied to some or all of your customers. For example, a national account could be assigned multiple prices for each of your products, depending upon the warehouse they pick up or get shipped from. Before this file can be used, it must be activated via the System Wide Setting - Options for Pricing by Warehouse. A sample Warehouse Price List Cross Reference Table is shown below.
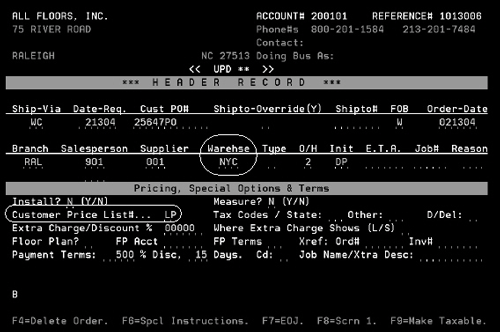
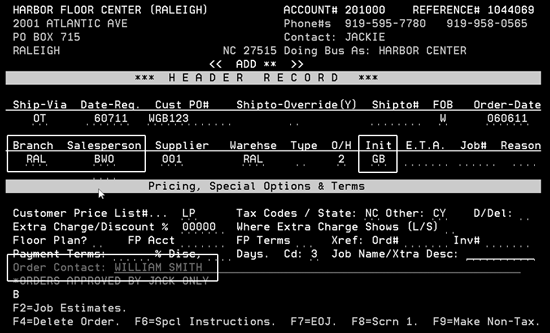
Cust-Ware - This is the normal "default" warehouse for the customer. Order-Entry-Ware - The warehouse assigned during order entry. This is the entry that is manually entered on the order header during order entry. Cust-Prc-List# - The default price list for the customer warehouse (Cust-Ware). New-Prc-List# - The new price list if the warehouse is changed on the Order Header. This setting relates to the Order Entry Ware setting. ExampleTo see how the table automatically changes a price list, consider this example. As shown in the order header below, a customer's normal warehouse operations are in Raleigh and use price list A1.
If this customer wants to schedule a pick-up at a warehouse in New York, when the warehouse on the order header is changed the Price list also changes to reflect the settings in the Warehouse Price List Cross Reference Table. In this case, the price list automatically is changed to LP.
The price list number is only changed when:
The price list is not changed if there is pricing on the F9 - Pricing Exceptions or F14 - Additional Codes screens in the Billto file. |
| Warehouse Will Call Tax Table - SYS 905 |
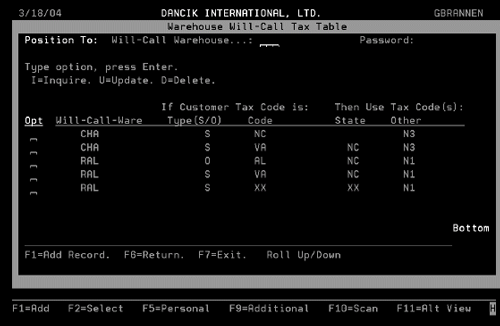
In some states, the "will call" tax rates are dependant on the business address of the customer as well as on the business address of the warehouse servicing the customer. This means that different customers who "will call" (pick up goods) at the same warehouse may be charged different tax rates. It also means that the same customer can be charged different tax rates if that customer "will calls" from different warehouses of the same business and those warehouses are in different areas in terms of taxation. This option creates a table that automates the taxation of "will calls" in such states. The Warehouse Will Call Tax Table automatically adjusts the tax codes on an order, based upon the business address of the customer as well as the business address of the will call warehouse. Before the Will Call Tax Table can be used, it has to be activated via the system wide setting Options for Taxes On Will Call Orders.
Note: Blank fields are ignored during Order Entry. Listed below are some examples of how this table works:
The fields on this screen are described below. Will-Call-Ware - This is the warehouse where the material is going to be picked up. This warehouse relates to the header warehouse of an order. This table is used only if the Will Call tax Table is activated in the System Wide Settings. If the Will Call Tax Table is not activated, then the system checks for will-call tax rates in the Warehouse File If Customer Tax Code is Type (S/O) Code - This information reflects the current tax type (S= State Tax and O=Other Tax) and tax code of the customer. The O tax code can apply to any type of tax that isn't a state tax (i.e., county or city tax). This information is found in the Billto file. When a will call (customer pickup) order is entered, the Order Entry program checks for this tax type and Tax code and if it is entered into the Will Call Tax Table it is automatically converted to the values shown in the "Then Use" columns. Then Use Tax Code(s): State Other - These are the codes that are used to assess taxes on will call customers. When an order is processed for a will call customer, the order entry program accesses the Will Call Tax Table and changes any applicable tax codes to the ones in this column. |
| Purging Quotes From the Quote Management System - SYS 906 |
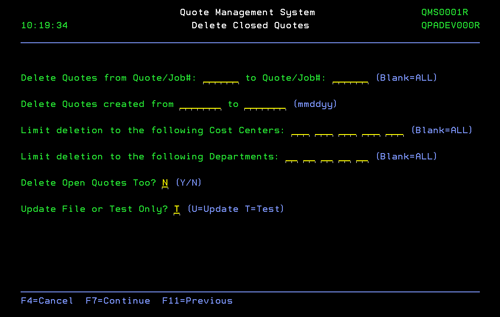
This option allows you to delete old or unwanted quotes from your system. You can delete quotes based on several parameters such as quote numbers, dates, departments, or cost center.
Delete Quotes from Quote/Job# - Enter a range of quote numbers to delete. If you only want to delete one enter its number in both fields. Delete Quotes created from - Enter a date range in MMDDYY format. Any quotes that fall within the entered date range are deleted. This is the only mandatory field on the screen. Limit deletion to the following Cost Centers- Enter the cost center codes you want to delete quotes for. If you enter cost center codes, only quotes related to those cost center codes are purged. If you leave the field blank, all cost centers are considered. Enter a ? in this field to display a listing of all available cost centers. Limit deletion to the following Departments - Enter the department codes you want to delete quotes for. If you enter department codes, only quotes related to those departments are purged. If you leave the field blank, all departments are considered. Enter a ? in this field to display a listing of all available departments. Delete Open Quotes Too - Flagging this field to Y directs the system to delete any open quotes that fall within the parameters set. The default is N. Update File or Test Only - Running this utility in test mode produces the same report as if you actually updated the file. This enables you to review the information that will be purged. Running a test (T) is the default. Running an update purges the quotes contained within the parameters. A report is generated detailing the quotes that were deleted. After entering the purging parameters, press Enter then F7 to produce a Purge Report. If you entered a U in the Update File or Test Only? field, the quotes are purged from the system. It is recommended that this report be run in "T" test mode before attempting to update the file. This enables you to review the report and make any needed adjustments to your selection parameters. Once all selection parameters are correct and you are satisfied with the results, continue the purge process in "U" update mode. |
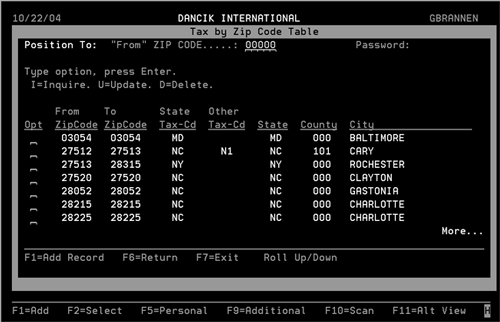
| Tax By Zip Code Table - SYS 907 |
This table lets you establish tax rates for zip codes. When an order is overridden in order entry, the system can use this table to automatically calculate the taxes based on the order's final destination. The Tax by Zip Codes Table is activated via the System Wide Setting - Options for Taxing Based Upon Shipto Address.
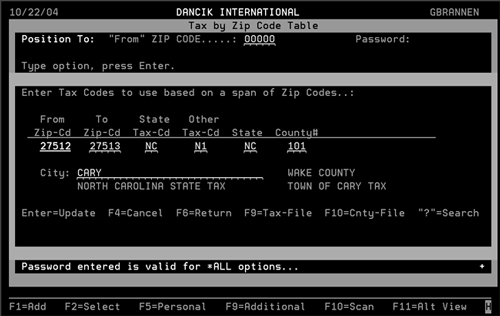
The I-Inquire and U-Update options bring up the same screen. The update screen is shown below.
In this example, the following entries were made:
The screen also displays all the taxes charged to this zip code. In this case, a city tax, county tax, and state tax are applied. Function Keys
Effects on other parts of the system
|
| Auto Update Item Rating - SYS 908 |
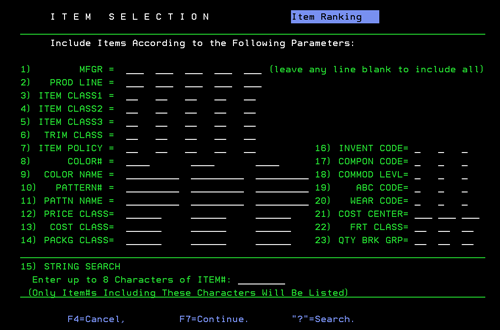
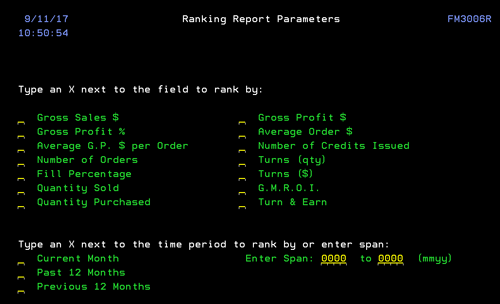
This utility allows you to rank your item numbers. It provides a better management tool and saves manual entry time in updating Item File to user's discretion. For example, you can rank your items from the best sellers to the worst sellers and then make decisions based on that information. The first screen in this process lets you select items to rank. For example, if you only wanted to rank items from one manufacturer, enter that manufacturer's code in the MFGR field.
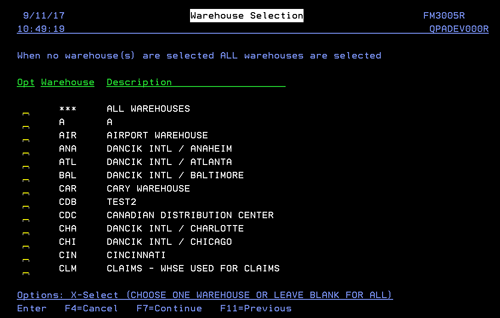
To include all items, leave all the fields blank. Press Enter and then F7 to proceed to the next screen. This screen lets you narrow the ranking to certain warehouses.
Enter an X in the appropriate Opt column to include the warehouse in the report. Press Enter then F7 to proceed to the next screen. The top part of the screen allows you to choose the statistic you want to base your rankings on. The bottom part of the screen lets you choose a time period to base the ranking on.
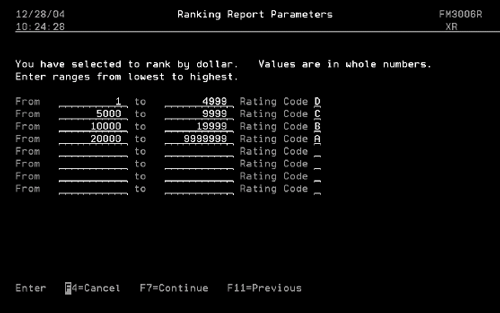
Make the necessary selections and press Enter. If you choose a ranking option that ranks by a dollar amount (Gross Sales $, Gross Profit $, Average Order $, Turns $), the Ranking by Dollar screen appears. This screen allows you to enter a from and to dollar amount range and the corresponding ABC rating code they would like to enter in the item rating.
Notes about this screen:
As an example, consider the following entries:
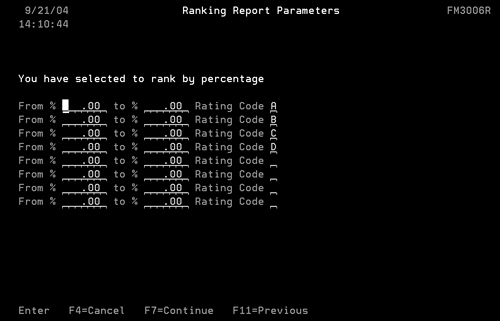
If one of the options that ranks items by percentages is selected, the screen shown below appears.
Notes about the Ranking By Percentages Screen
If you choose one of the options that ranks items by quantity, the same screen that is used for ranking by dollars appears. If you have already entered information into the screen previously, that data is displayed. Review it for accuracy. After selecting your ranking criteria, press Enter and then F7. A series of screens allow you to make the following selections/decisions:
The last screen in the process asks if you want to update the item master with the results. If you enter a Y the system automatically updates the item master of any items within the ranges and parameters you set. Entering an N, directs the system to produce a report but no changes are made. The report generated can be used to see what items are affected by your entries. Regardless if you enter a Y or an N a reports is created. The top part shows your parameter settings and the bottom area shows the parts that were affected. |
| Tax Audit Inquiry by Invoice Number - SYS 909 |
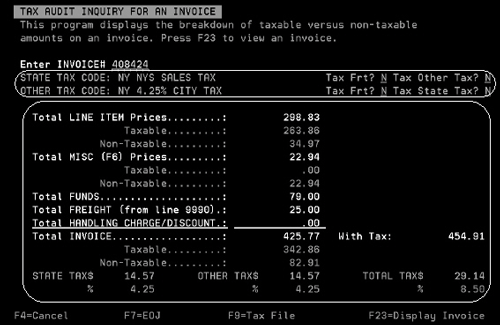
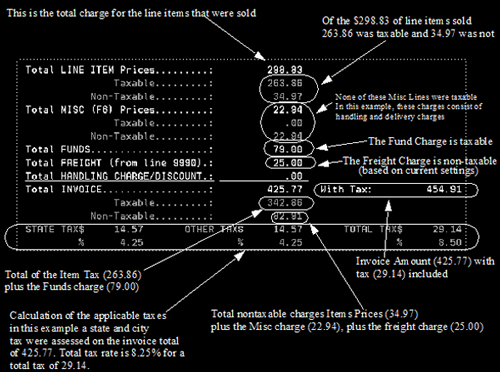
This program displays the breakdown of taxable versus non-taxable amounts on an invoice. The taxable and non-taxable amounts are shown as originally calculated. This keeps the historical information accurate and not based on tax rates, which may have changed since the invoice was generated. Enter the invoice that you want to display the historical tax information for and press Enter.
The screen below describes the tax breakdown for this invoice.
This screen is meant to be used for research, in anticipation of a tax audit. It enables you to see how your system tax options are set, as well a what taxes were actually charged on any invoice.
|
| Shipping Charges By Zip Cd Table - SYS 910 |
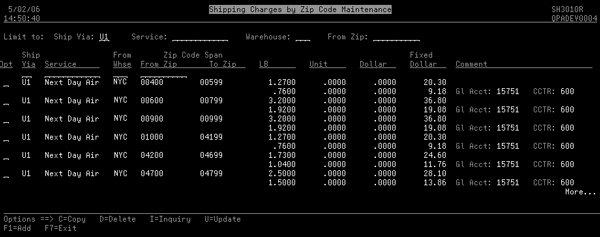
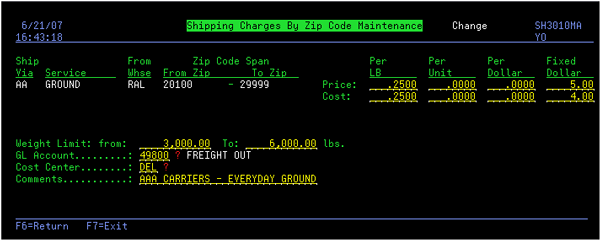
This table, accessed via menu option FIL 44, controls a pop-up window that appears within the Order Entry and Order Change programs. It allows you to view and assign freight charges based on the following parameters:
The Special System Maintenance Program Shipping Charges by Zip - Import - SYS 919 allows you to import an Excel spreadsheet containing shipping charges information directly into the Shipping Charges By Zip Cd Table. Most freight companies will supply you with rates as a spreadsheet. Although each freight company will have its own format, you can cut and paste the columns and rows that you need from each freight company into the Kerridge-supplied spreadsheet format. When the rates appear in order entry or order change, you can use the information to inform a customer of shipping costs or changes in shipping costs. When a rate is selected, the charge appears as a line on the order. You can control the markup of these charges, so that a margin is made on the freight.
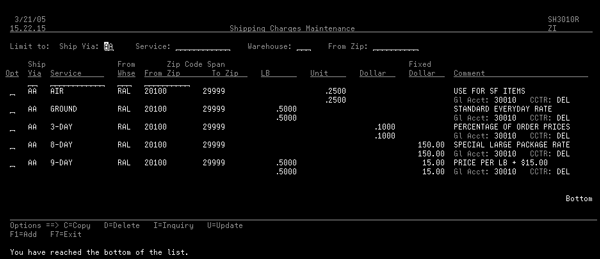
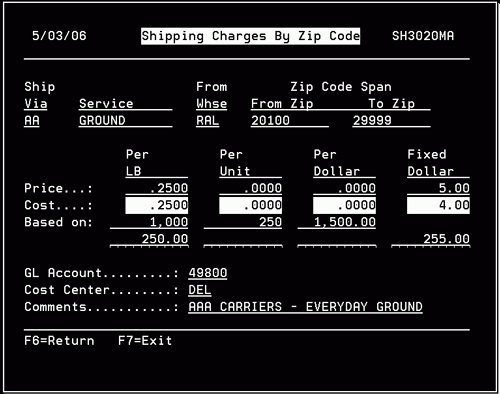
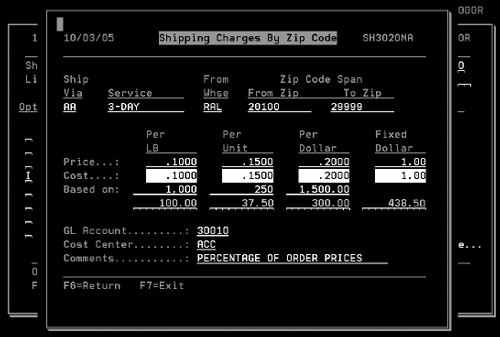
The parameters that establish the freight costs, LB, Unit, Dollar, or Fixed Dollar, do not have to be mutually exclusive. For example, the shipping rate could be based on two parameters such as $.25 per pound and $10.00 fixed cost. Whenever more than one type of rate is entered into a single record, they are added together. For example, if a single record contained $.25 per pound plus a fixed dollar rate of $10.00, then the shipping charge is calculated as $10.00 plus $.25 per pound. Example Table 1Consider the following table.
In this example, the AA ground rate is $.50 per LB. The AA air rate is $.25 per SF, and the ABC 3-day shipping rate is $.10 per dollar of the order. If the order has the following conditions:
If you extend the rates, the user has the following choices:
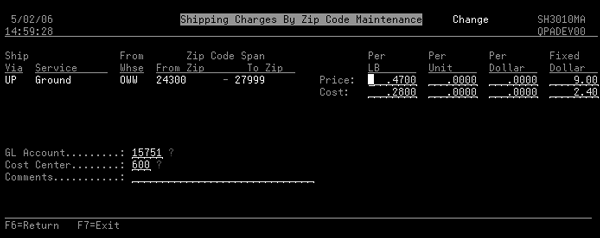
Example Table 2 - Minimum Charge plus Charge per Pound
This table entry is typical of many standard carriers such as UPS. The cost of the shipping charge is a fixed minimum amount of $2.40, plus an additional $.28 per pound. This table is marking up the UPS cost, so that the customer is charged $9.00 plus $.47 per pound. Example Table 3 Filtered By WeightIf the Shipping Charges by Zip Code Table has from and to weight limits assigned, as shown below, the Shipping Charges by Zip/Postal Code Inquiry is filtered by weight.
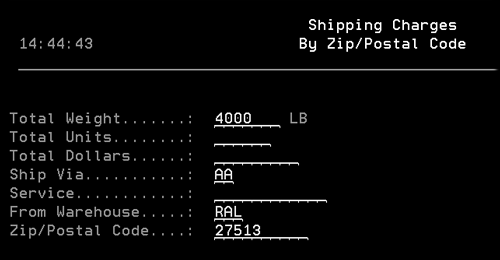
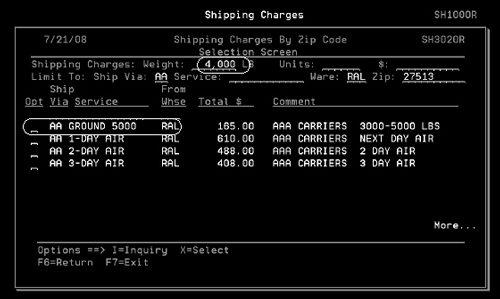
These fields interact with the Shipping Charges by Zip/Postal Code Inquiry (CUS 20), by limiting the shipping services shown to only those that fall within the weight limits. For example, a Total Weight of 4,000 lbs. falls between the weight limits of 3,000 and 6,000 lbs. set on the Shipping Charges By Zip Code Maintenance screen for service AA Ground RAL.
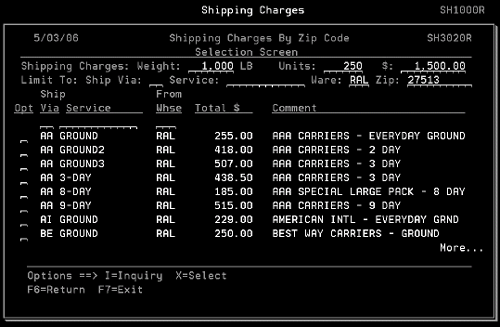
Shipping service AA Ground RAL appears as an option on the inquiry.
Changing the weight to under 3,000 lbs or over 6,000 lbs removes AA Ground RAL from the shipping charge inquiry. |
| Shipping Charges by Zip Code Inq - SYS 911 |
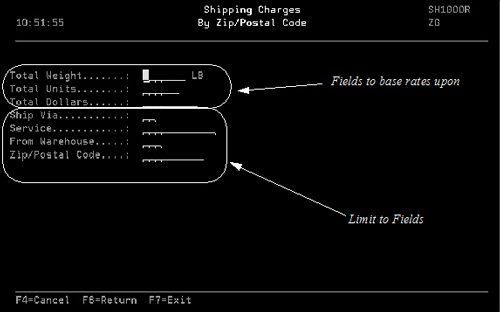
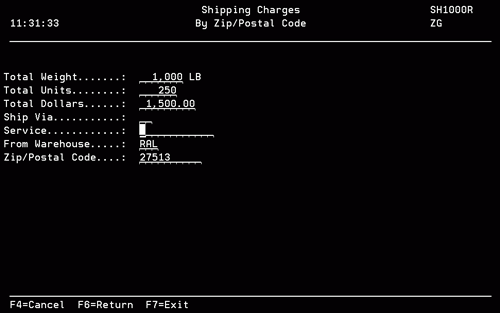
This option allows you to quickly and easily check and compare freight costs. There are several parameters that you can use to check shipping charges. You can also limit the inquiry to specific parameters such as a particular freight company. The first three fields, Total Weight, Total Units, and Total Dollars are the fields that the shipping rates are based upon. Use them separately or in combination to get a shipping quote. The last four fields, Ship Via, Service, From Warehouse, and Zip/Postal Code are "limit to" fields. Use these fields to narrow your inquiry down as needed. For example, if you enter warehouse RAL in the From Warehouse field only shipping charges that originate from the RAL warehouse will display.
The middle portion of the screen contains the actual calculations based on lbs., units, and dollars. In this example, shipping costs are based on the weight of the shipment (1000 lbs.). Shipping costs are calculated at $.25 (your price per pound for shipping items). This comes out to $250.00 for shipping costs based on 1,000 pounds being shipped.
If there is more than one parameter calculated, all the calculations are totaled. In this example, a $1 fixed charge plus the three other totals reflect the sum (438.50) of all the charges. Note: The GL Account, Cost Center, and Comments information is established when the Shipping Charges By Zip Cd Table - SYS 910 is built. |
| Import Customer Itm X-Ref Table - (SYS 912) |
This option enables you to maintain your customer-specific item numbers and descriptions in an Excel file (.CSV spreadsheet format), and then to use that file to upload to and update the Customer Item file. When building the spreadsheet that is going to be imported, it has to be built to an exact format. It must include the following columns in the following order.
When the report is run, any of the columns that exceed the maximum amount of characters are noted. The fields in the .CSV spreadsheet cannot contain any commas. Commas are picked up by the file parser as a field separator. An example spreadsheet is shown below.
The first row, in this example contains the headings, which are not imported. Using an Excel spreadsheet to upload item information
Note: Records are never deleted using this process. To delete records, the user must still use the Customer Preferences File F13 screen. At the bottom of the report is a summary that displays the number of records added, how many records had errors, and the total amount processed (which should be the total of the records added and records in error). |
| Remove Inventory History & SKU Records for Inactive SKUs - SYS 913 |
This utility removes the inventory transaction history, item SKU, and ROLLS (serial number) records for inactive items within a specific warehouse. This can help clear "clutter" out of your system. The item is not removed from the Item File (FIL 2). This removal option is designed primarily for items that have been long discontinued, or warehouses that have been closed. Also refer to option ARC 11, for archiving as well as purging inventory history. Inactive items are defined as:
Notes about the Remove Inventory and SKU Records for Inactive SKU screen:
Use Option RIV 1 - Print Audit Trail For An Item to ensure an item has been deleted. |
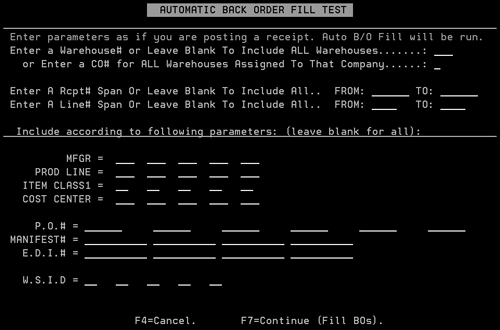
| Test Automatic Back Order Fill - SYS 914 |
This function allows you to test your back order fills. It fills the back orders based on your settings, but does not actually post the receipts. This allows you to review the back order reports and then use INB 4 - Fill Back Orders to proceed or make changes as needed.
|
| Remove Stray Serial# Records - SYS 915 |
This program lists and/or purges any serial numbers that do not have corresponding item numbers. Stray serial numbers can occur if the item goes to zero inventory (in total) and then the item is purged by the item purge program. If the item had any serial or roll records out of balance, then some strays could be left. To view a history of the users that used this option to remove stray serial numbers, use option 3 - Work w/ User Menu Option History on the Performance Options (MNU). The menu option history log contains the last 100 options accessed by each user, showing the date and time accessed. On the screen that appears, enter a 1 to generate a report only. Enter a 2 to run the report and purge the rolls. If the report were run in production mode (2), the system would identify these rolls or serial numbers as having been purged out of the system. |
| Item Inventory Clean-up - SYS 916 |
This option performs the following:
When this option is selected you are presented with two options that look for inventory imbalances.
Next, you are prompted to run the inventory clean-up for one item or multiple items. Single Item If you are running it for a single item, simply enter the item number. Next, select when you want to run the report/job.
Multiple Items If you are performing the inventory clean-up for several items, you can check all the items from a manufacturer or items in a specific product line. The application shows the number of unique jobs (items) that will be loaded and run. The results of a multiple item inventory clean-up are sent to job queue IVAUD4J where they can be held or released. Each item corresponds to a job in the job queue. The jobs are identified in this job queue with an "M"anufacturer or "P"roduct line. It is highly recommended that inventory clean-ups for large groups of items be done after working hours. |
| List & Update Stray OPENIV record - SYS 917 |
This option lets you list and/or delete stray inventory records by manufacturer. It allows you to run the equivalent of an inventory audit and inventory update for all items for a specific manufacturer. This option compares open inventory transactions (from the stock card screen) to figures in related files. Stray inventory records are:
Stray inventory records can occur when one of the following happens:
When this option is selected, you are presented with the following options:
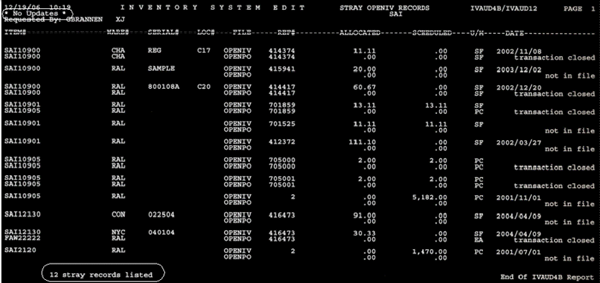
An example report is shown below. If an update (option 2) was run, the No Updates comment in the top left-hand corner would be changed to Updated, and the message at the bottom would be 12 stray records deleted.
The report lists the stray records, and shows if the corresponding record in the order files was not found, or was found but was no longer open. |
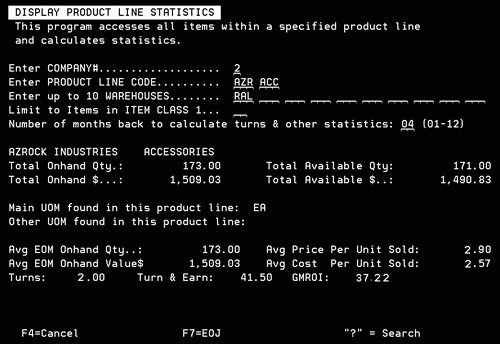
| Product Line Statistics Screen (related to Product Budget Reports) - SYS 918 |
This option provides a snapshot of important statistics about a specific product line. You can limit the information displayed by warehouse, item class 1, or number of months. You must enter a Company number, a product line code (which consists of a manufacturer and a product line), and the number of months to consider (the default is 4). Use the warehouse and item class fields to narrow your report as needed.
|
|
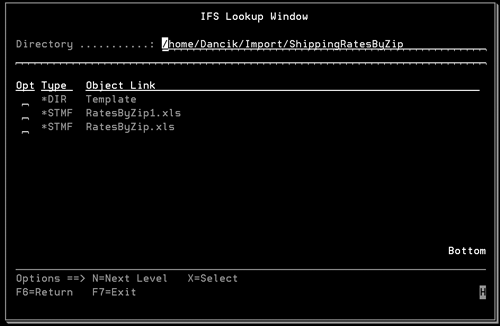
This option allows you to import an Excel spreadsheet containing shipping charges information directly into the Shipping Charges By Zip Cd Table (FIL 44). Most freight companies will supply you with rates as a spreadsheet. Although each freight company will have its own format, you can cut and paste the columns and rows that you need from each freight company into the Kerridge-supplied spreadsheet format. Importing Information from an Excel Spreadsheet into the Shipping Charges By Zip Code Table Set-upDownloading the Excel template to your PC Creating a Shortcut to The IFS folder where the Excel Spreadsheets are stored Moving a spreadsheet from the PC back to the IFS Downloading the Excel template to your PCWhen this option is distributed, an Excel template file is placed on your IFS. The IFS (integrated file system) is a part of the iSERIES storage system that supports PC files. It is essentially a file server that stores and shares files between a PC and an iSERIES computer. Find the IFS Directory path to the Excel template. If you don't know it, contact your system administrator. An example directory is: home/Kerridge/import/ShippingRatesByZip/Template. You should copy this template to your PC. You can do this through the following steps:
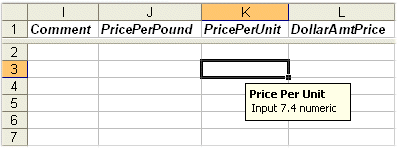
Building the SpreadsheetOnce you have the template downloaded to your PC, you can use it to build your shipping data spreadsheets. When you enter data onto the spreadsheet, save it using the SAVE AS option and not the Save option. Saving the template with data entered can corrupt it, and a clean template is necessary to import information. When you are in the Kerridge-supplied spreadsheet, you can click any of the cells to see the form in which the data should be entered.
Troubleshooting Tips:
Creating a Shortcut to The IFS folder where the Excel Spreadsheets are storedCreate a short cut on your PC for easy access to the IFS directory/folder. This IFS directory/folder is where option SYS 919 is going to look for the spreadsheets to import. 1. Right click on your PC desktop. 2. Select New and then Shortcut. 3. Enter the location for the IFS directory where the Shipping Charge spreadsheets are stored. 4. Press Next to name the shortcut and place the shortcut's icon on your desktop. Moving a spreadsheet from the PC back to the IFSAfter shipping charges have been added to the spreadsheet, it needs to be moved back to the IFS. Simply click the shortcut icon created in the steps above and move or copy the spreadsheet into the folder that appears. Importing Information from an Excel Spreadsheet into the Shipping Charges By Zip Code Table
For information on how to build and maintain this table, refer to Shipping Charges By Zip Cd Table - SYS 910. |
|
|
This option allows you to mass update the special instructions entered via the F12 key in the Item, Manufacturer, and Product Line Files.
The process for adding and deleting instructions is essentially the same. Keep in mind, that when you are deleting a message/instruction your entry has to match the existing message exactly. That includes capitalization and print settings. Press Enter to proceed to the next screen which allows you to set inclusion parameters. You can make the update very broad (i.e. by entering just a Manufacturer and leaving all the other fields blank) or very narrow by entering information in several of the fields. The entries on the following screen will affect all item class 1 items identified as WT (wall tile) for the manufacturer SAI.
Press Enter to access the messaging screen. In the example shown below, two instructions are being mass applied.
Enter a Main type and an optional Sub Type. The Sub Type codes are user defined. One possible use of a Sub type code could be to identify the language in which the instructions are written, or can have user defined meanings. These codes can also be used to store a URL for web-pages related to an item. When the product knowledge screen is displayed in Order Entry, Order Change, Inventory Inquiry, or via the Decor 24 application (on a web-connected PC), the URL may be clicked to open the web page. Choose the documents you want to have the special instructions printed on. The following documents are available PL (picklist), ACK (acknowledgment), INV (invoice to customer), P/O (purchase order to supplier).
|
|
| Hold & Back Order Fill Contact Table - SYS 921 |
This table works in conjunction with the Holds & Back Order Reshuffle process to deallocate inventory from held orders and allocate it to back orders. It contains the email addresses to notify those concerned of events such as back order being filled or held order being released. An email will be sent to any and all matching entries based on the values in the order or hold. The orders have to go through night jobs before the email is sent out. Only the categories activated in the System Wide Setting - Option for Removal of Unprocessed Orders/Holds from System will actually receive emails. In the example shown below:
Types
The System Wide Setting - Options for Back Order Fill contains an option that allows you to send an email to an email contact when a back order is filled. |
| Run Reshuffle Holds - SYS 922 |
This option allows you to manually reshuffle holds. Holds can be reshuffled automatically via night jobs. The System Wide Setting - Options for Removal of Unprocessed Orders/Holds from System allows you to specify the number of days held inventory (unprocessed orders) is honored before being automatically released by the system. Reshuffling of holds can allow for better utilization of inventory while avoiding having customer service staff review night job reports to determine the held inventory which was has now become available and may be used to service existing back orders. Associated Files |
| Purge Billto Price Exception File - SYS 923 |
This maintenance feature allows you to remove promotional pricing files or price list assignments (from F9 pricing exception screens on customers) by end date. Prior to the introduction of this utility in 2012, expired records had to manually removed. On the screen that appears, enter the date that you want to purge pricing exceptions up to.
It is recommended that you enter a date 90 days prior to today's date. This helps to eliminate deleting records that might still be in use. Associated FilesBillto Pricing Exceptions Screen (Function F9 on the Billto File)You can use this screen to review and update promotional and exception pricing. This screen displays promotional pricing that the customer is eligible for and the effective dates of those prices. A pricing exception is a price list number or promotional program other than the customer's regular price list number assigned on the Billto Profile screen. This utility purges pricing exceptions that meet the following criteria on the Billto Pricing Exceptions Screen:
|
| Import Future Prices from IFS - SYS 924 |
This utility allows you to upload information from a .CSV spreadsheet into the Future & Sale Price File. You can use the Future and Sale Price File to enter prices in advance of their effective dates or to institute temporary sale pricing. The program changes the prices on the effective date of the sale and changes prices back to normal when the sale is over. The system automatiÂcally changes prices during Night Jobs, and a prints list of those changes.
Spreadsheet Template
|
| Purge Unprocessed Pending lines with no allocations by Date (back order) - SYS 925 |
This utility purges unprocessed back orders based on the entered date. Processed orders are not purged.
|
| Purge Expired Price Exceptions/PROMOS - SYS 926 |
This option deletes promotions from the Price Exceptions screen that are expired and have no Effective Date and no End Date. This condition occurs when a Customer Exception Pricing record has a promo pgm # with no associated PROMO record. Price exceptions are assigned in the Billto File. Navigator
Green Screen
Since the two Price Exceptions shown below meet the conditions to be purged (expired, No Effective Date and No End Date), they will be purged when SYS 926 is run.
|
| Cost Class Update Feature - SYS 927 |
This batch updating process helps to eliminate the manual updating of pricing which can be very labor intensive. As part of this functionality the following two spreadsheets, in .CSV format, can be built by a manufacturer and then disseminated out to the distributors of their products:
Note: The column headings must be included on both spreadsheets. When option 927 - Cost Class Update is selected the following screen appears.
Both Test and Live mode produce a report that lists: Spread sheet errors are printed on both Test and Live reports, but no updates are performed when errors are found.
|
| Import Future Costs from IFS - SYS 928 |
This setting provides the ability to mass upload cost changes via a CSV upload process.
Click here to access a template for the spreadsheet.
Associated Files: |

